. Maximize your stock headlight’s output using our high quality relay kits. These kits eliminate thin OEM wiring & in-line switches, to deliver full power to your headlight. Hand made from the best quality components. Designed for plug and play installation. Built to last the life of any motorcycle. .
Single Headlight H4 Relay Kits
Coupler Option is how the kit receives the Hi/Lo signal. H4 coupler usually means no modification to the bike wiring. See explanation at bottom of page. Main Lead is how power is connected to the kit ( from battery direct, or Fuse Box etc ). LO Cut is an option that allows you to switch off your LO Beam. You will need a switch to connect to your selected connection,.
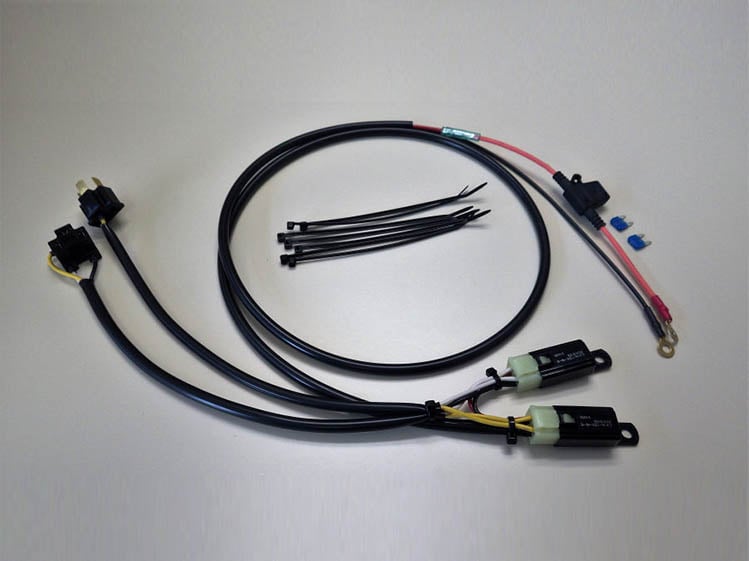
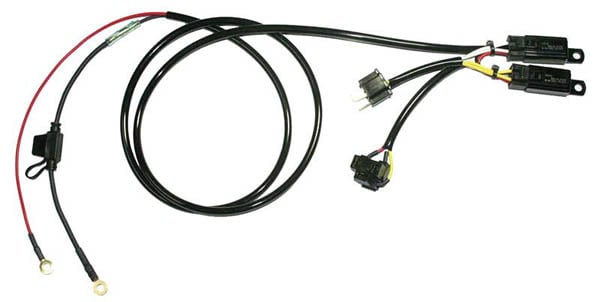
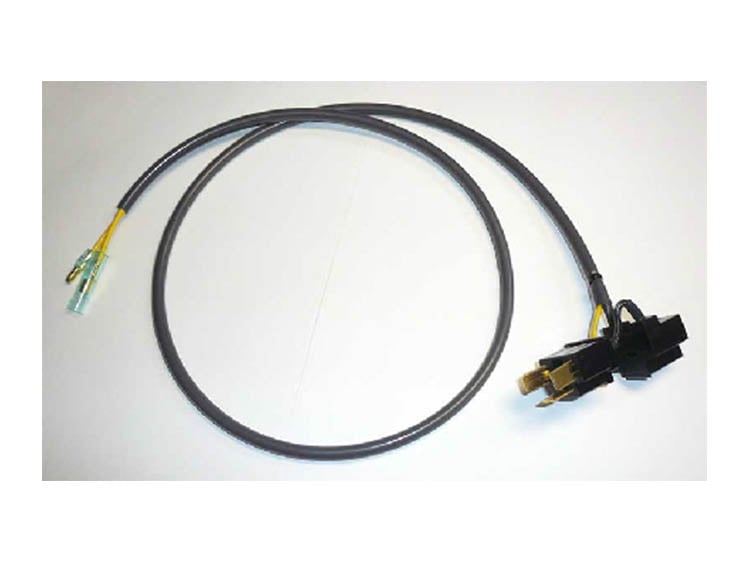
H4 Single Headlight Relay Kit – [In Headlight Shell]
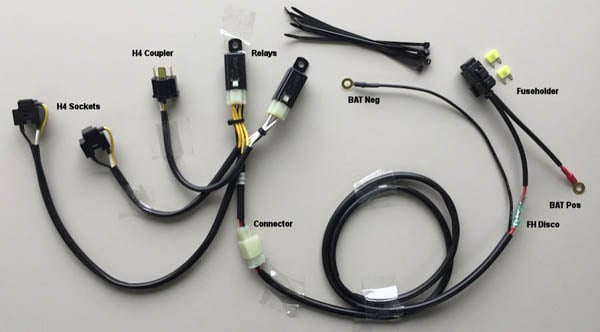
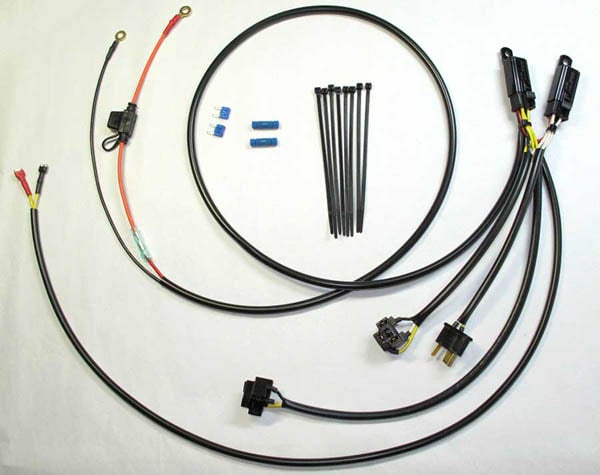
Main leads 61” (155 cm) AWG 14 (2 mm2) high temp cross linked Yazaki wire covered with high temp sheathing. Bulb leads 6” (15 cm) – for installing the relays inside a headlight shell. Two heavy duty 20A Panasonic Relays socketed into the wiring. Cooper-Bussman ATM Fuse holder with two 15A fuses is removable with a bullet connector to make running wires easy. Fusepanel Connection option – main lead wires are longer and sheathed to 6 in (15 cm) from ends. Choice of H4 Coupler or a Sealed Posilock option for relay triggering – see H4 Coupler Connection above. Includes cable ties to secure your Kit to your bike. LO Cut allows connection of a switch to cutthe LO Beam.
$64.95–$84.95Price range: $64.95 through $84.95
Coupler Option is how the kit receives the Hi/Lo signal. H4 coupler usually means no modification to the bike wiring. See explanation at bottom of page. Main Lead is how power is connected to the kit ( from battery direct, or Fuse Box etc ). LO Cut is an option that allows you to switch off your LO Beam. You will need a switch to connect to your selected connection,.
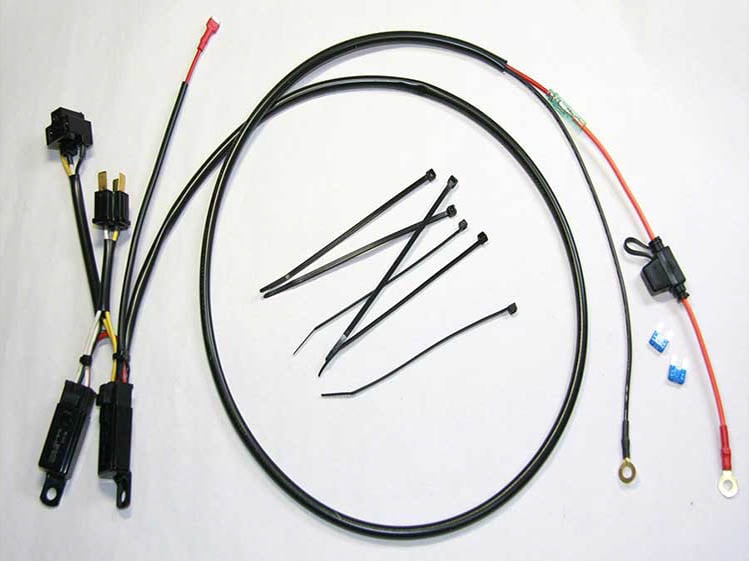
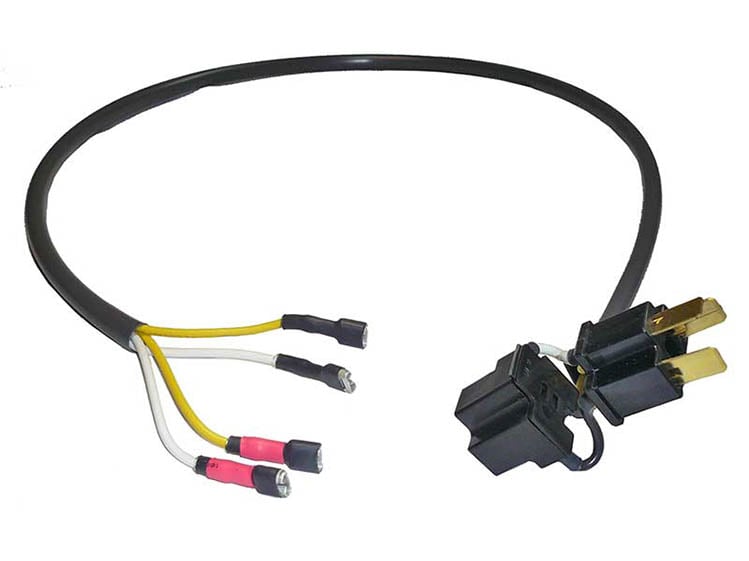
H4 Single Headlight Relay Kit – [In Fairing]
This Kit is has longer bulb leads for fitting the relays remotely in a fairing, where there is no regular headlight shell. Main leads 61” (155 cm). Bulb leads 16” (40 cm) – allows the relays to be remotely mounted from the headlight. Two heavy duty 20A Panasonic Relays socketed into the wiring. H4 Coupler makes installation easy by plugging into your stock headlight socket for relay triggering. Cooper-Bussman ATM fuse holder with two 15A fuses is disconnect-able to make running wires easy. Includes cable ties to secure your Kit to your bike. Fuse panel Connection option – main lead wires are longer and sheathed to 6 in (15 cm) from ends. Choice of H4 Coupler or a Sealed Posilock option for relay triggering – see H4 Coupler Connection above.
$66.95–$89.95Price range: $66.95 through $89.95
Coupler Option is how the kit receives the Hi/Lo signal. H4 coupler usually means no modification to the bike wiring. See explanation at bottom of page. Main Lead is how power is connected to the kit ( from battery direct, or Fuse Box etc ). Driving Light Output can be on the LO or HI Beam ( not both ). LO Cut is an option that allows you to switch off your LO Beam. You will need a switch to connect to your selected connection,.
H4 Single Headlight Relay Kit with Driving Lights Output
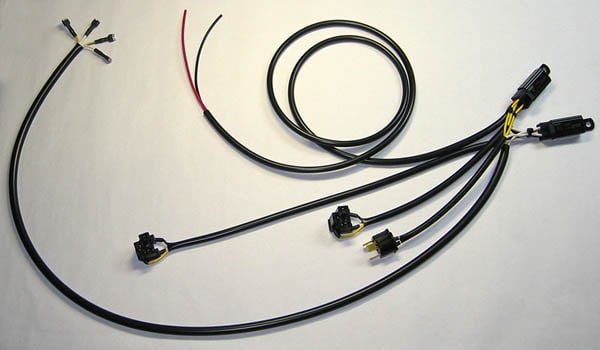
This kit has an extra output you can use to power extra driving lights, via a switch ( not included ). This Kit is an H4 Single ‘In Shell’ Headlight Relay Kit with an extra lead for powering ‘Driving Lights’ as found on Harleys and other cruisers. Relays go inside the headlight shell. The extra lead plugs into the toggle switch to power the driving lights.
$70.95–$89.95Price range: $70.95 through $89.95
H4 Single Headlight Weatherproof Relay Kit
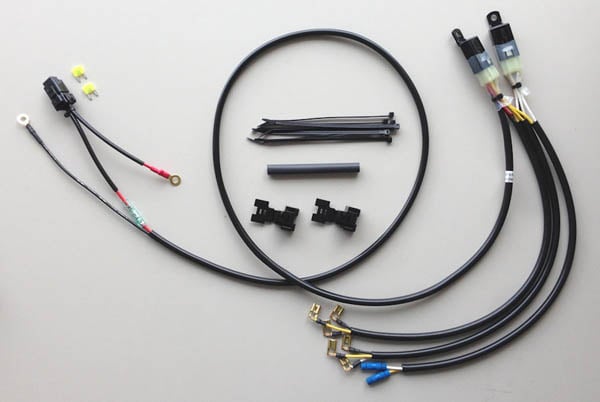
This Kit is specially for bikes like the BMW R1100GS which has a tight fitting headlight housing cover. Also, this Kit is for bikes with a very small headlight shell. This Kit allows easy insertion of the bulb leads into the headlight shell. The Kit is shipped with bulb leads out of the socket and they are then plugged in after installing the wires into the headlight housing. The relays can be mounted further back, either in the fairing or under the front of the fuel tank. The relays are shrink wrapped to keep out dirt and moisture.
Main leads 57” (145 cm) Bulb leads 20” (50 cm) Posi-Locks included with shrink tube for HI/LO connection instead of H4 Coupler. Fuse panel Connection option – main lead wires are longer and sheathed to 6 in (15 cm) from ends.
$69.95–$88.95Price range: $69.95 through $88.95
H4 Single Headlight Positive Ground Relay Kit
This Kit is basically the same as the regular H4 Single ‘In Shell’ Kit, except the wire colours are reversed with red wiring for the ground circuits. It is designed to connect directly to the battery.
$64.95–$74.95Price range: $64.95 through $74.95
Dual Headlight H4 Relay Kits
H4 Dual Headlight Relay Kit – [In Fairing]
This Kit is for bikes with dual fairing mounted H4 headlights. Can be mounted to the left or right sides of the bike. H4 socket or Posi Locks to connect to existing wiring.
$77.95–$97.95Price range: $77.95 through $97.95
H4 Dual Headlight Relay Kit with Low Beam Cut
Use the panel connection option – main lead wires are longer and sheathed to 6 in (15 cm) from ends.
$87.95–$99.95Price range: $87.95 through $99.95
H4 Dual Headlight Relay Kit – [ In Bucket ]
This Kit works perfectly for bikes like the Triumph Rocket III, which have two separate headlight shells. Also great for custom bikes with twin billet headlight shells. Relays can be mounted in 1 headlight bucket or under the front of the tank.
$87.95–$99.95Price range: $87.95 through $99.95
H4 Dual Headlight Relay Kit with One Headlight Cut
Same H4 Dual Kit but with built in wiring for a Headlight Cut Switch (DPST). H4 Headlight cut adapters only are available separately here. This Kit cuts both beams of one H4 Socket, in fact the one with the shorter leads. If you want to cut the right headlight, bring in the Kit’s main wiring from the right side. To cut the left headlight, bring in the main wiring from the left side. You can buy a DPST switch for this Kit here (Toggle) or here (Rocker).
PLEASE NOTE – YOU CAN’T USE THE SPST ON/OFF BARSWITCH WITH THIS KIT.
$91.95–$95.95Price range: $91.95 through $95.95
H4 Dual Headlight Weatherproof Relay Kit
This Kit is made specially for those bikes like the Triumph Rocket III, which have two separate headlight shells. Also great for custom bikes with twin billet headlight shells.
$88.95–$90.95Price range: $88.95 through $90.95
H4 Lo or Hi Beam Cut Adapters - Cuts one beam on one headlight.
H4 Hi Or Lo Beam Cut Adapter
Works on HI or LO beam (depending on model), saves 55 (60 for HI beam) watts of power for your other accessories.
$36.95
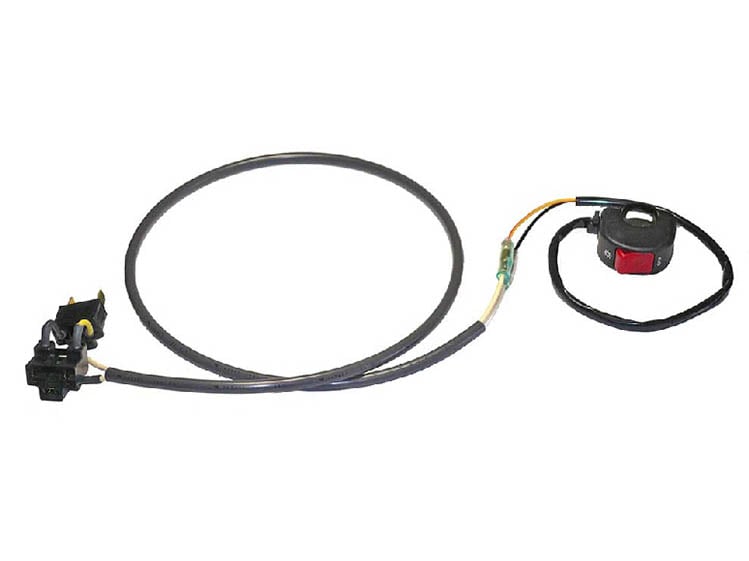
H4 Lo or Hi Beam Cut Adapter with Handlebar Switch
H4 Lo or Hi Beam cut adapter with bullet connectors, in combination with a handlebar switch.
Complete unit, just plug the headlight end between one bulb and its socket, attach the switch to your bars, run and cable tie the wires and you’re all set. Includes cable ties.
Handlebar switch is available separately on the Switches Page.
NOTE: A customer has informed me that on his VStrom 650, this switch won’t fit on the left side due to the bent clutch lever. However it will fit on the right side of the bars.
$45.95
H4 Lo And Hi Headlight Cut Adaptor – [Single Bulb]
Works on both beams of one bulb, saves 55-60 watts of power for your other accessories.
Now you can run a pair of Auxiliary Lights and get that triangulation that you need to be noticed by cars.
$42.95
Triumph Rocket III
I now have a special H4 Dual Kit for your bike, look here. Note, some Rocket III bikes have an H4 Single headlight and can use my H4 Single In Shell Headlight Kit at the top of this page. Installation info here
Bikes with Twin Headlight shells with H4 bulbs can use the Rocket III Kit. ( H4 Dual Headlight Relay Kit – [ In Bucket ] )
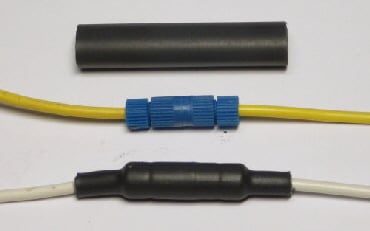
About the Coupler Connection - PLEASE READ
Most H4 Kits now have an option for either an H4 Coupler to plug into your stock bulb socket for HI and LO beam switching. As an alternative you can remove the H4 Coupler and make a more secure and tidy connection using a pair of Posi-Locks or you can solder these wires. There are some pros and cons for each as I will note here:
Option 1 – H4 Coupler:
PROS: Easier install, just plugs into your old H4 Socket. Easy to remove later if you sell the bike. Easy to reconnect the old H4 socket to the bulb if you have a problem with the Kit. I would consider a Relay Kit a permanent install on that bike so NOT using the Coupler makes sense to me.
CONS: Coupler/Socket combo makes a bulky unit you have to wrap and tie up somewhere safely. It’s more difficult to fit inside a crowded headlight shell. Old headlight H4 socket must be taped up to avoid shorting exposed terminals.
Option 2 – Posilock Connection:
PROS: Removes the bulky coupler/socket unit. Avoids poor connections with an old corroded plug. Makes installing inside a headlight shell easier with less bulk. Avoids any potential shorting of old H4 socket terminals.
CONS: Requires cutting off bike’s old H4 Socket. Not as easy to remove Kit later if you sell the bike. Posi-Locks join the hot wires from your old headlight to the Kit’s 2 coupling wires. These connections switch the new relays using your HI/LO switch.
Option 3 – Solder/Shrinkwrap Connection:
Requires crimper or soldering skills. You can connect these wires in many different ways. For example you could use a set of connector housings, either sealed or unsealed.
If you use insulated butt connectors, please do not think that pinching them with pliers is good enough. These connections don’t pass high current but are important for headlight operation.
Jim's Recommendation:
I believe that a Relay Kit should be a permanent part of your bike. I like neat and tidy installs and I don’t like old plugs, bulky connectors that are unecessary, or possible bad connections. Installing sealed Posi-Lock connectors instead of the H4 Coupler really cleans up the area around the back of the headlight or inside the shell. Why not pick up a few extra Posi-Locks and Posi-Taps with your Kit? Great for all wiring, even around the house!