Generic kit shown. Shipped will be Tenere 700 specific
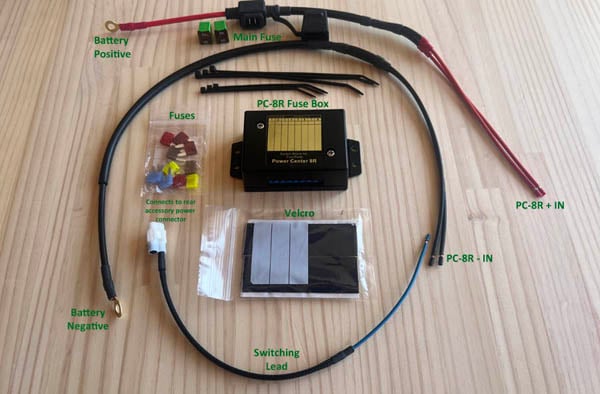
Tenere 700 PC-8R Kit
PC-8r accessory fuse box for the Yamaha Tenere 700. Provides 6 switched and 2 battery direct outputs. Robust design proven over a decade. Replaceable relay and corrosion resistant hardware. Yazaki cable & OEM connectors. Plug and play kit.40A capable. Maximum 15A per output. Battery direct outputs can be used for trickle chargers, battery chargers or heated gear.
Delay Option add a 15s delay before switched outputs turn on, after power up. Size refers to the wiring harness. There is a 30A or 40A wiring kit option.
$119.95–$174.95Price range: $119.95 through $174.95
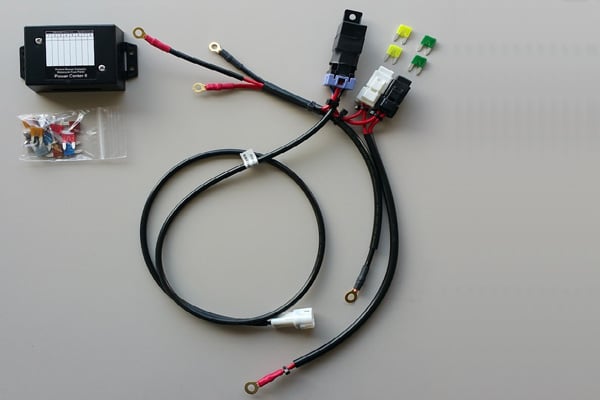
Yamaha Tenere 700 PC-8
PC-8 accessory fuse box for the Yamaha Tenere 700. Provides 6 switched and 2 battery direct outputs. Robust design proven over a decade. Replaceable relay and corrosion resistant hardware. Yazaki cable & OEM connectors. Plug and play kit.
50A capable. Maximum 15A per output. Battery direct outputs can be used for trickle chargers, battery chargers or heated gear.
$54.95–$127.95Price range: $54.95 through $127.95
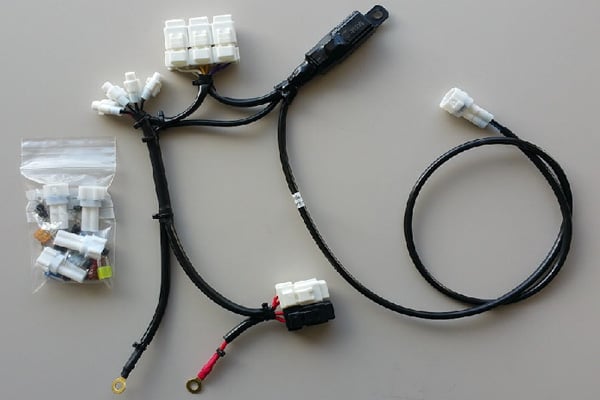
Generic Kit Show. Bike Specific Kit Will Ship
Tenere 700 PC-8E Electronic Fuse Box Kit
Electronics fuse box with 8 circuits, of which 2 are battery direct and 6 are switched. Rated at 45A continuous. Switched outputs are 10A, 10A, 15A, 5A, 5A, and 15A respectively. Waterproof, rugged design. Circuits are reset, by cycling the ignition. No more replacing fuses. LED’s indicate eFuse status. Power good signal on front.
$164.00–$178.00Price range: $164.00 through $178.00
Yamaha Tenere 700 4CS Sealed
Compact & flexible accessory fuse box kit for the Yamaha Tenre 700. Provides 4 outputs. 3 switched with the ignition and 1 battery direct. 30A total capacity. Tidy up your battery terminal connections. Flexible kit make for easy installation. Fuse holders carry spare fuses.
30A capable. Maximum 15A per output. Battery direct outputs can be used for trickle chargers, battery chargers or heated gear.
$64.95–$78.95Price range: $64.95 through $78.95
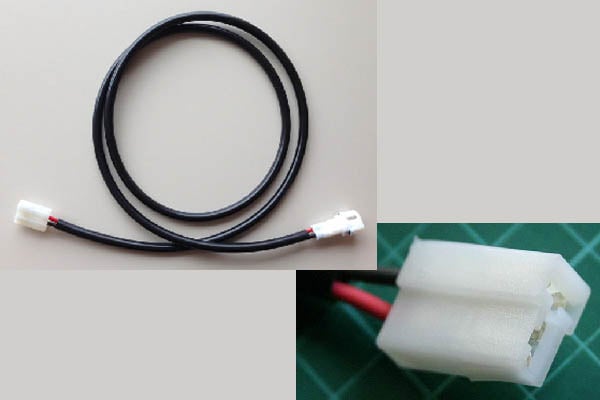
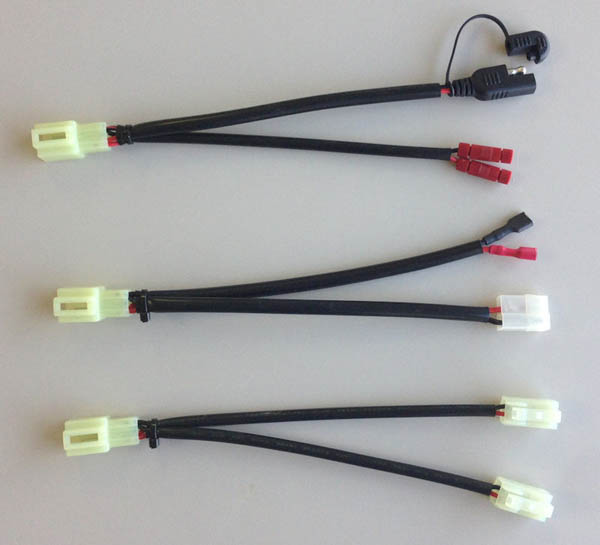
Various extension and adapter cable for all sealed CS kits. Allows quick connection of accessories.
CS Kit Extensions
– pre-made solutions to connect from the CS Kits to your accessory. – male connector on one end and a female on the other end, male plugs into a CS Kit output connector – then you can use one of the included (comes with every CS Kit) male connectors on your accessory wires to complete the circuit – give you a modular way to connect your circuits
$10.25–$16.95Price range: $10.25 through $16.95
CS Kit Leads with SAE Plug
CS connection to SAE. 2 Prong SAE Plug for battery chargers, etc., WITH 16 AWG wire. (NOW WITH SAE CAP)
$10.95–$18.95Price range: $10.95 through $18.95
CS Kit Leads with T-Connector
CS connection to Powerlet & Hella connection. 2 Prong T-Connector for Powerlet and Hella type Socket – with 18 AWG wire
$10.95–$18.95Price range: $10.95 through $18.95
CS Kit Leads with .250″ Spade Connector
CS connection to Powerlet & Hella connection. 2 Prong T-Connector for Powerlet and Hella type Socket – with 18 AWG wire
$10.95–$18.95Price range: $10.95 through $18.95
CS Kit Sealed Splitter
These splitters are designed to allow you to power even more accessories from your CS Kit. All splitters are 15 cm(6”) long. They are made of high quality Yazaki wire of 0.75 sqmm (18 AWG), with high temp flexible sheathing. You can order any of the combinations below and more. Pick the connectors you need for your accessories.
$19.95
2 Pin MT 090 Sealed Connector.
2 Pin MT 090 waterproof connectors. As used on CS kits. Includes terminals and seals.
$1.95–$3.95Price range: $1.95 through $3.95
Other Cables & Connectors
Aux Light Splitter
This 3 Pin splitter is for those that have something plugged into the stock aux light connector that these Kits use for relay switching. With this splitter you can plug in and use whatever is now plugged in, and also plug in the switching lead on our PC-8 or 3CS Kits on this page. Or you can power one or two of the Power Leads below.
$24.95
Yamaha Tenere Aux Light Lead
You can use this adapter to power GPS, Aux Lights, and any other accessory using low or medium current draw. Wires, connectors, and sheathing are high temp, highest quality, Japan made and assembled by Eastern Beaver. Three 16 AWG wires: ground, switched power and always hot power
$16.95
T700 Front 2 Pin Accessory Port Connector
You can use this adapter to power GPS, Aux Lights, and any other accessory using low or medium current draw. Wires, connectors, and sheathing are high temp, highest quality, Japan made and assembled by Eastern Beaver. Three 16 AWG wires: ground, switched power and always hot power
$1.05–$2.10Price range: $1.05 through $2.10
3 Pin MT 090 Sealed Connector
You can use this adapter to power GPS, Aux Lights, and any other accessory using low or medium current draw. Wires, connectors, and sheathing are high temp, highest quality, Japan made and assembled by Eastern Beaver. Three 16 AWG wires: ground, switched power and always hot power
$1.05–$2.10Price range: $1.05 through $2.10
26 Pin TE Superseal 1.0 Sealed Connector
Tenere 700 Dash connectors. There is no male connector ( inline ) so we only sell panel mount male connector. Connectors come with terminals. Seals are built in. We also sell a dash extender cable ( 30cm ) which will be online shortly.
$15.00–$39.00Price range: $15.00 through $39.00
4CS Installation Notes:
The kit is designed to be mounted under the riders seat. When shipped all fuses are removed, so that you can install safely. Once your installation is complete, install the main fuses ( two fuse holders near the relay ). Then switch on the bike and check that you hear a click from the relay. If there is no relay click, then the Aux light connection, must not be made. Please check that connection and that that the battery connection is correctly made.
Decide where you want the kit to fit ( placement under the riders seat ).
Route the switching lead forward to the Aux light connector at the front right of the bike ( usually taped to other wires just behind the front of the fuel tank ). It is a 3 Pin Sumitomo connector ( usually white ) and female. From the factory, the connector has a male connector with blanking plugs installed ( unless Aux Lights were ordered as an option ). Note: If you have Aux light fitted or another connection to the Aux Lights connector, you would need to purchase a separate “Aux Light Splitter” cable.
Connect the 4CS battery connections or if you have the PowerLink option, connect the Male and Female PowerLink connectors and then connect to the battery.
Cable tie all your cables neatly and avoid stressing connections by tieing cable too tight.
The two fuse holders closest to the battery ( between the relay and the battery connection ) are the Main switched and Un-switched/direct fuse holders.
Install the main switched power fuses. The black is the switched power. Remove the fuse holder cap and install a 20A fuse and the spare fuse and reinstall the fuse holder cap ).
The white fuse holder is un-switched/direct so install a 15A fuse and a spare fuse and reinstall the fuse holder cap.
Double check all your connections.
Turn the ignition on and listen for the relay click. You may need to do this a few times, if you miss the click sound.
Once you have verified that the relay is switching, you can now proceed to connect your accessories to the 4CS.
Note that only one output has a red wire connected to it. This output is the direct output.
Note you can match which of the three grouped fuse holder ( switched output fuses ) connects to which output, by the color of the wires attached.