Before Ordering: You must first figure out where you’ll mount your fuse panel on your bike. Most important is to find a location where it fits with some room to wire into it. You should be able to access the fuse panel later if you blow a fuse. The fuse panel should be sheltered from rain and dirt. Ideally, it should be mounted somewhere between the battery and the front of the bike, since that’s likely where your accessories will be. If necessary, the fuse panel can be mounted in the tail of the bike if that’s the only place you can put it. However, when using a rear location, you’ll need to run long wires up front to your accessories. In that case, you might consider wire looms which run several wires in one sheathing.
30A Single Circuit Fusepanel Leads Only
$25.45–$39.95Price range: $25.45 through $39.95
M5 Ring Terminal Installation Option:
If you want an extra pair of M5 mm ring terminals and shrinktube so you can trim the lengths if necessary, click below:
2 x M5 Ring Terminals and Heat Shrink
$1.99
These terminals and more are available on my Terminals Page, if you need spares.
The M5 ring terminals on this Kit will fit the AP-1 or Bluesea fuse panels’ input posts.
30A Single Circuit Fusepanel Relay Kits
Battery Lead Lengths – the NEG battery lead by default is 6” (15 cm) longer than the POS lead as shown above.
$25.45–$39.95Price range: $25.45 through $39.95
50A Dual Circuit Fusepanel Relay Kits – PC-8 or AP-2
Switched circuits are turned off when the bike is shut down. An unswitched circuit is always hot.
$42.95–$56.95Price range: $42.95 through $56.95
POWERLINK OPTION
You can order the Powerlink option on all of the above kits. That will allow easy disconnect and allow the use of our Powerlink jumper, and other abilities, see the Powerlink Page for more info. Please note that if you order the Powerlink Option you also need to order your choice of Powerlink Battery Leads. You can order Powerlink Battery Leads with POS lead longer or both battery leads the same, to better fit a Kit to your bike. Check your battery post configuration before ordering. The Powerlink Battery Leads can add extra length to the kit by ordering in longer lengths, plan overall kit length needed accordingly.
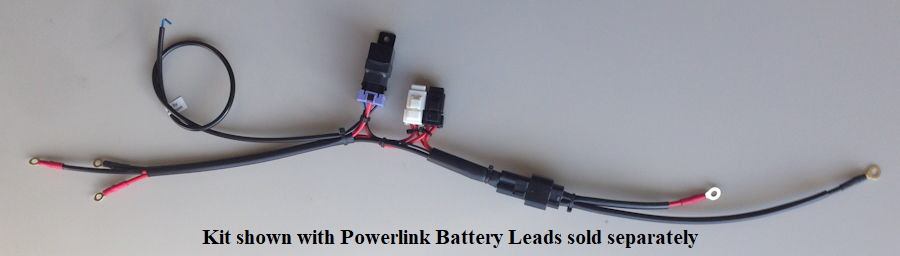
All PC-8 Kits can now be ordered to fit our Powerlink Connection. Below is a PC-8 18” Kit with Powerlink hookup.
Above kit shown with battery leads of 6 inches/NEG +6
EXTRA COST OPTIONS
Battery Lead Configuration Option: The default PC-8 Kit battery lead configuration is NEG +6 inches. If you’d like a Kit with both battery leads the same length or the POS lead +6 inches, you can pay for those options below. You must be buying a PC-8 and Relay Kit above. Battery terminal position is what dictates your lead choice. If the POS battery post is furthest away from the PC-8 then you’ll choose ‘POS +6 Inches’. If the battery is sideways to the path of the wiring, choose ‘Both Same’.
PC-8 & AP-2 Wiring Kit Options
Select which lead you want longer for connection to the battery. The wire routing direction will determine which lead is longer.
$0.00–$4.00Price range: $0.00 through $4.00
Protective Diode in Switching Wire Option
A protective diode can be ordered inline on the ignition switched lead, preventing switching voltage transitions effecting the bike. This is highly recommended for CANBus bikes. Can be ordered on standard or PowerLink kits.
$5.95
Extra Terminals, Sheath and Shrinktube: If you have ordered your Kit a bit long because you’re unsure of the exact length needed, these optional parts will allow you to cut the fuse panel leads shorter and install new terminals.
PC-8 & AP-2 Terminals & Heat Shrink – Extra’s
Extra M5 ring terminals and heat shrink to allow adjustment of the fuse box side cable lengths.