DIY Basics: if you’re wiring the PC-8 yourself, you should run two fused hot lines from the battery POS to the fuse panel. One should go through a 40A relay to the PWR post, the other directly to the BAT post. Run one main ground to the GND post. The relay will need it’s own ground and a switched hot lead from a switched hot on the bike. This could be the tail light, pilot light, or any other wire which is hot only when the bike is on. Please read the rest of this page as well, and check the wiring diagram at the bottom of this page.
WARNINGS AND IMPORTANT INFO PLEASE READ CAREFULLY: I’ve heard people say the first thing they do when a fuse blows is they insert a new fuse. PLEASE PLEASE PLEASE NEVER DO THAT! You’ll just blow your spare fuse. FIND THE PROBLEM, FIX IT, AND THEN REPLACE THE FUSE. 99 times out of a hundred a fuse blows because of a short circuit. Very rarely does a fuse just blow or go bad of old age. IF A FUSE BLOWS YOU HAVE A PROBLEM, DEAL WITH IT! If that means riding to a shop or home so you can fix the problem, then that is what you have to do. You were warned.
Do good wiring and you will never have to change a fuse. I have never had a fuse blow while riding. You really should never see your fuse panel again after you install all your accessory circuits. Install it well, take your time, make it perfect NOW. You were warned. Never place a fuse in a circuit larger than the wiring in that circuit can handle. You may burn your bike to the ground if you do. You were warned.
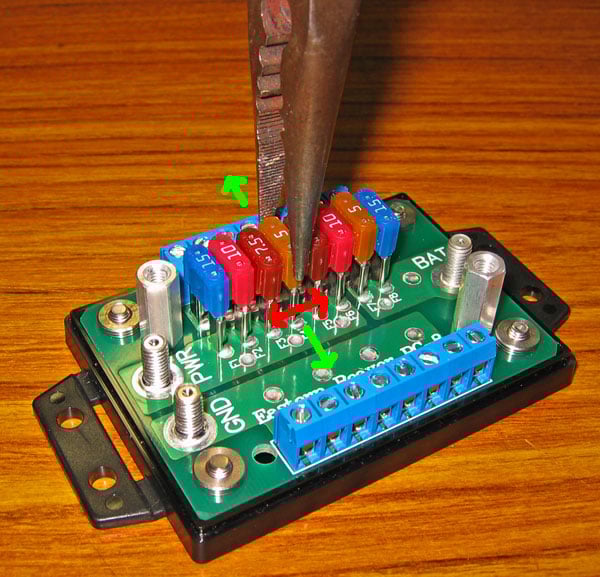
Setup: Before installing in your bike, you should first setup your PC-8 with the correct fuses for your circuits. That means inserting the fuses of the correct value where you want them. Before inserting any fuses, here are some things to consider in planning their size and positioning. Try and space higher current circuits’ fuses as far apart as possible, using the fuse(s) between them for lower current circuits. If you’ll have unused fuse positions, use these for storage of spare fuses. Store spares of your more important circuits such as headlights. To remove a fuse always use needlenose pliers and rock the fuse slightly side to side while withdrawing it (see below). These fuses are a very tight fit in order to avoid excess resistance and therefore heat on the PCB. If you’ve ever used a Centech fusepanel you likely know that their fuses practically fall out of the clips. On the PC-8 this can’t happen, as the fuse clips hold the fuses very tight!
Pulling a fuse - the green arrows are the correct way to rock, not the red arrows.Rock the fuse the same way when inserting.
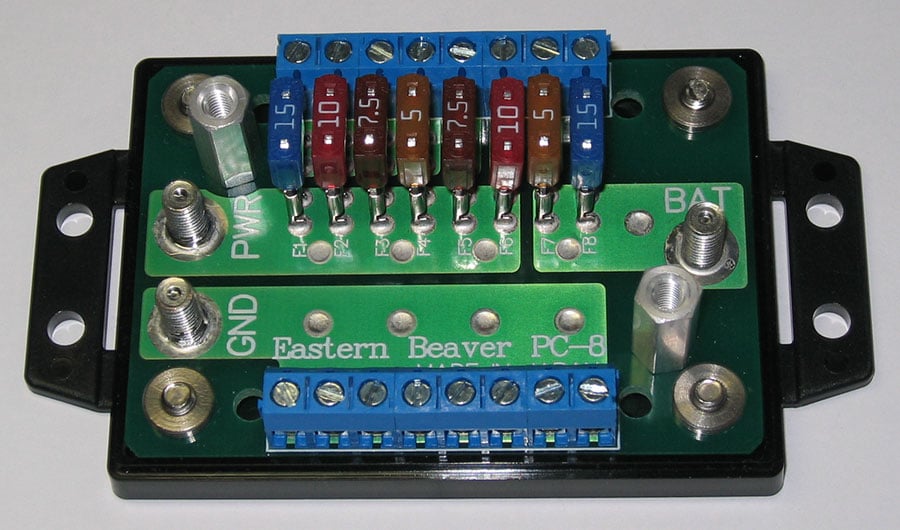
Fuse Planning: Start with the two unswitched circuit fuses. You might want a socket and a GPS on these fuses, so insert appropriate sized fuses, such as a 5A and a 15A (see below). Insert the largest value fuse on an end position if possible.
Fuse Installation: Carefully insert the fuses one at a time Use a slight side to side rocking motion (see above) towards the terminal blocks, until the fuse is fully seated. Do not bend the fuse holders. Insert each fuse slowly and carefully.
Below is an example of good fuse positioning.
Fusepanel Installation:
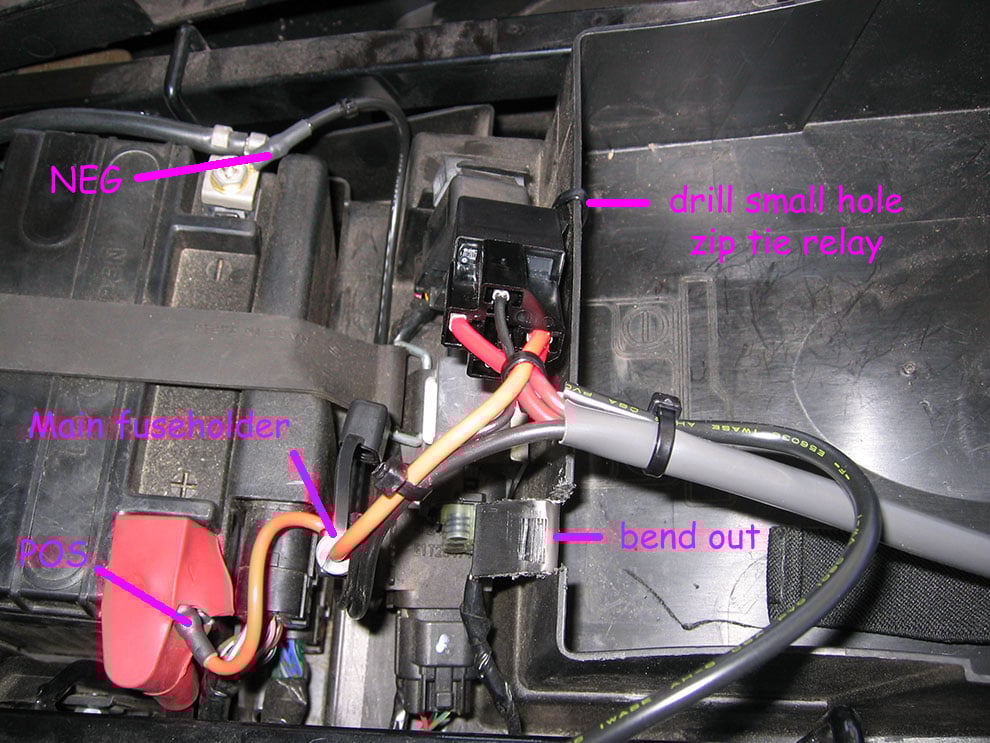
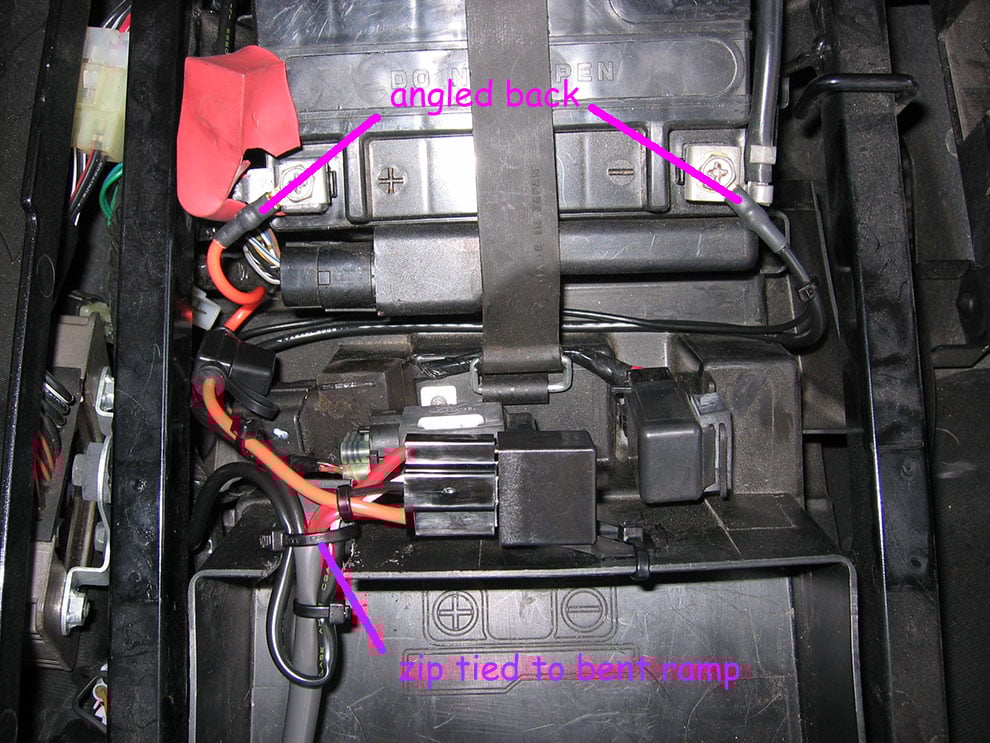
First make sure no fuse is in the Kit’s main fuseholders. These fuses will go in last after you’ve double checked everything. Now attach the main battery leads. Start by removing the NEG battery bolt and move all NEG wires away from the post so they won’t touch. Now remove the POS bolt and slip the Kit’s main POS lead on top of existing terminals and snug the bolt back down. Now bolt the kit’s NEG lead on top of other leads and snug the bolt down.
Attach the relay somewhere handy. I used one cable tie here to a small hole in the plastic tray. You might want to plan the relay location and fuse panel location out first before connecting anything. As long as there is no fuse in the main fuseholder you won’t cause any problems on the Kit because no power is going to it.
Please note: These pics show our old style kit, the new kits have dual main fuseholders and install is basically the same. For bike specific kits see the page where you bought the kit for special install help involving where to plug in the switching connector.
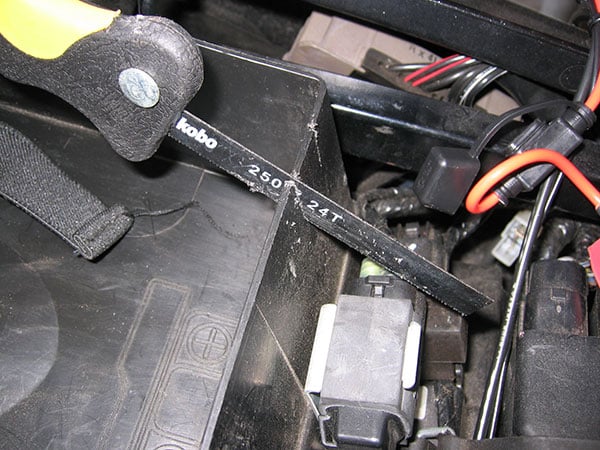
Below you can see how I cut the slots for the wire entrance. Bending the cutout made a nice place to cable tie my wires.
Below you can see how the wires are routed and tied. You really want to take your time and make all your wires neatly tied down as you go, rather than coming back later to neaten things up, finish up as you go from battery to fuse panel.
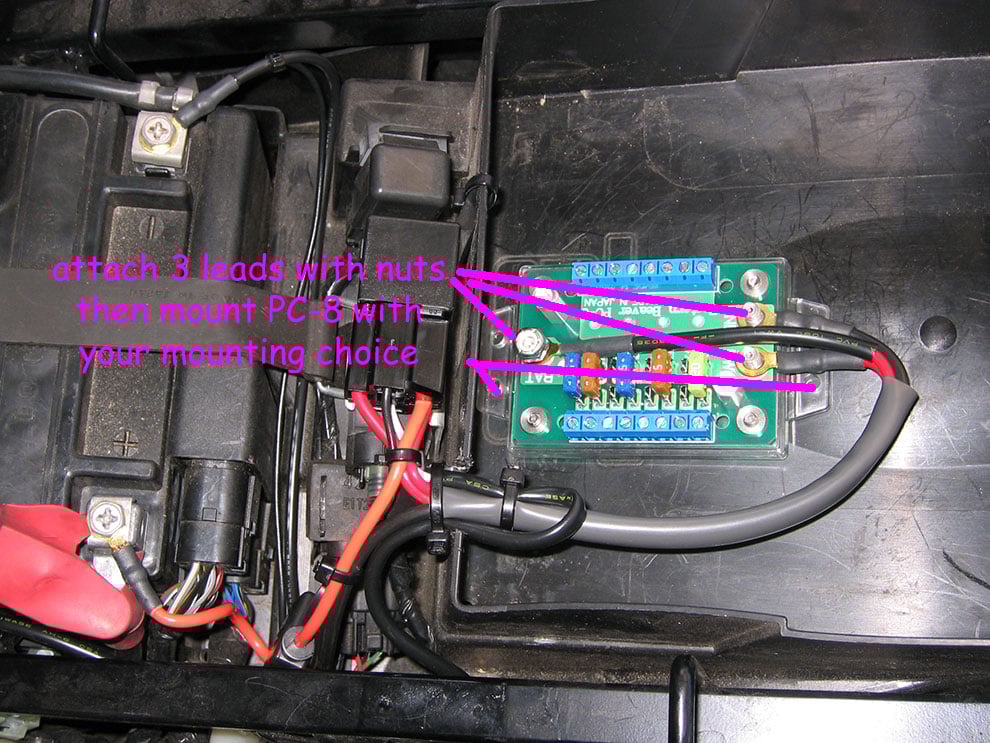
Now position the PC-8 where you want it and attach the main leads.
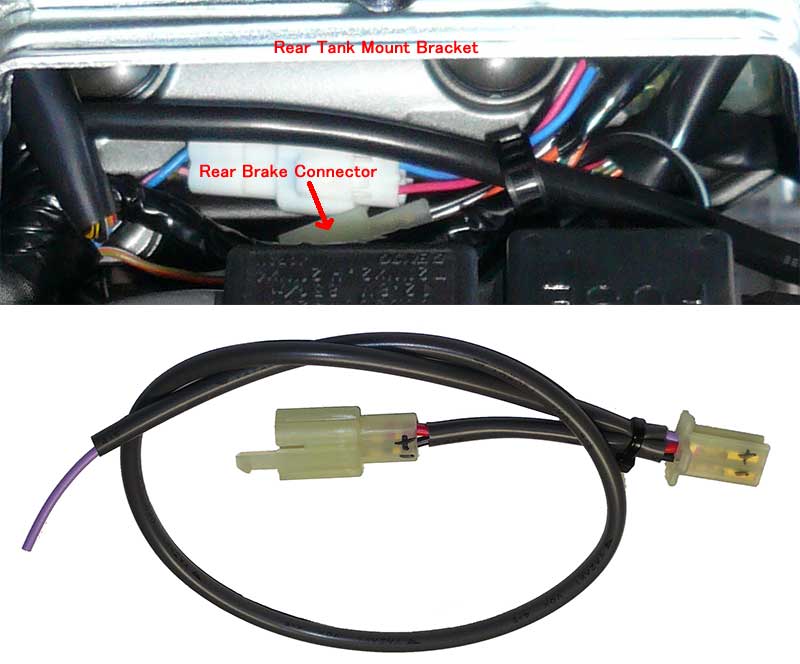
SWITCHING LEAD: I connected the VStrom Kit’s switching lead to the rear brakelight connector shown below. Generic Kits will have to connect the blue wire, with a Posi-Tap, to a switched hot wire on the bike. You can use the licence light wire, tail light wire, a pilot light, or a wire feeding a brakelight switch as on the VStrom.
INSTALLING YOUR ACCESSORY CIRCUITS
After installing the Kit, you will have to install all your accessory wires as shown below. Before adding all the circuit wires, you might want to test your fuse panel and make sure everything is working. Then you can install all your circuits to it. However, whenever you are working on a circuit, adding wires, etc., PULL THE MAIN FUSES. As long as the main fuse is out you can’t short anything or otherwise have a problem. So put the main 30A fuse in (switched circuits) and test everything, then pull it out before adding wiring. New Kits have a 20A fuse for unswitched circuits.
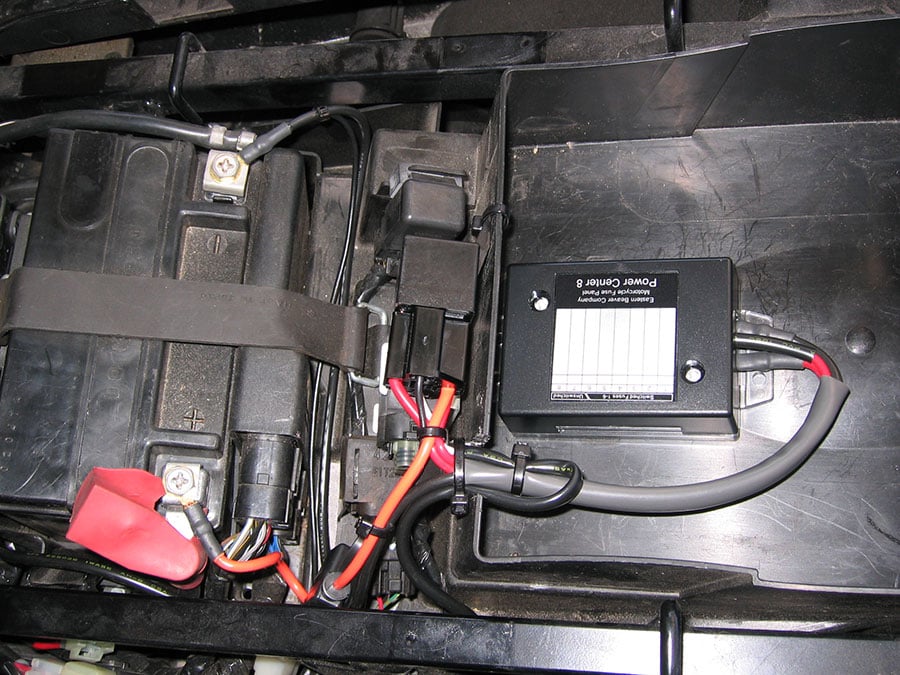
Above is my PC-8 install on my VStrom.
1 – side socket (switched 15A) – used for heated gear
2 – H4 Dual Kit (switched 20A) – this is a necessity on a VStrom
3 – front socket (always hot 10A) – GPS and battery charging
4 – alarm (always hot 5A) – hot wire has its own 2A fuse in inline holder so I left it, besides those wires were short.
5 – this bunch of posi-locks is the combo of my VStrom Brake/Tail/Signal Adaptor and the Backoff XP. My alarm also ties in here to activate the signals. The backoff flashes the brakelights.
6 – Main fuse. DO NOT INSTALL A FUSE HERE UNTIL YOU ARE FINISHED AND HAVE DOUBLE CHECKED YOUR WORK! (30A) Remove the main fuse before you begin to wire your circuits to the PC-8.
I drilled three 8mm holes along the side of the tray for the three circuits coming from outside the tray.
The alarm is just behind the seat latch on the left, held down by one Dual Lock strip. The PC-8 is held down with two self tapping screws in opposite corners. I have used a clear prototype cover so that it’s easier for me to show off without removing the cover.
There are many ways to install a PC-8,, even on the same bike. I could have moved the relay over and brought the wires straight into the PC-8. There is enough extra wire in the Kits to accommodate many different configurations. I will be adding photos and info here from customers with other types of bikes, please send me yours.